Friday, October 16, 2009

Finish Coats of Paint

Both downstairs bedrooms got painted last weekend, and my parents got the living room painted yesterday.  The upstairs bedroom ceiling is done, and most of the woodwork is finished.  We have started to strip the paint from the doors, and also have a functional kitchen.


The smaller 1st floor bedroom in a blue, on the left.

On the right is the larger 1st floor bedroom, done in an aqua.


The living room and hallway are a light sage green.


The peach and green look good where the kitchen and the living room come together.  I am also glad we decided to paint the arches with ceiling white.


The black door is no longer black, and the wood looks really nice.  I think that all the doors will eventually be taken down to wood as we have time, but for now it will just be the ugliest.


Demolition in the attic has made it easier  to see just what fun we will have to deal with in the coming months.  The revealed  cast iron vent stack can now be extended, it currently only sticks out of the rook about two inches above the flashing.  

The pipe hanging in the background is a wood burning stove chimney.  That needs to be removed, the main chimney will need patched where that was cut into it, as well as likely need a new liner.  Once it is gone we can move on to the bathroom and add the vent fan that it needs.  The electricians will also be able to get back in there and add some plugs easier.

Monday, October 5, 2009

Paint and stripper


Today was another day of primer.  The living room got a second coat on the walls and a coat on the ceiling.  Our short hallway got the same.


The linen closet in the hallway got its primer on and is ready for final paint inside.  It will also need shelf paper, but we have plenty of that left over from Tisha doing the kitchen.


The pink closet is no longer pink in the slightest.  I also finally had time to work with the stripper, and it looks like I will be able to take it all the way back to wood with a little finessing.  So no more black paint.


The last of my tray of paint went into the stair way going up.  I just didn't want to drain it back to the bucket, and I wanted to see if I will be able to manage one coat or will it take two, or more.  At least the nasty colors have been disappearing one by one.  The upstairs bedroom is the last one to go.

The hardest part is figuring out the new colors in the living room and upstairs bedroom.  We could do another color in the stairway going up as well.

Sunday, October 4, 2009

Paint, Paint, Floors, Fans, and Fridges....


Last weekend I also put a final coat of primer in the 1st floor bedrooms, as well as finally putting down the final coat of polyurethane on the wood floors.  They all turned out great except for one section of the living room where I had run out of poly and tried to stretch what I had to cover the floor.  My advice here, don't run out of poly.  The strange thing was that I used less than three cans for the first coats, so can't figure out why it would take more than three cans for the final coat.  It must be a difference between the satin and the gloss finishes.  When we get everything else done I may come back and redo the last section of living room, or not.


While on my way to the house on Saturday I passed a moving sale that had a table and chairs for sale.  This is it in use in our kitchen, it holds our unpacking extremely well.  It came with four chairs and has a two foot leaf for the center.  Perfect for when we entertain or just need the room, like we do right now.


Tisha has been lining the shelves in the kitchen cabinets and drawers so we can put all my previously stored items away.  One quick cycle through the dish washer for most of them, and away they can go.  Though there is a lot of hand washing going on as well.  So far it looks like we will be able to easily combine our two kitchens into this one.  We still see a garage sale in the spring, though we may call it a renovating sale, or move-in sale, considering the items we will likely have.


This morning I was able to get the ceiling fan and light hung in the bedroom formerly known as ew pink.  I had to wait for my dad to get there to help hold the motor while I wired it up. It was just easier to do it that way than to wait and try to do the wiring in that tiny space.


After painting the ceiling in the small bedroom, I got my dad to help paint the living room with its first coat of primer.  Getting rid of that dark brown made it look so much better.  Tomorrow will be its second coat of primer, more primer in the bathroom, and primer in the upstairs bedroom.  Primer Monday.

We got our appliances delivered today, so I was able to wind down my day by making the various attachments need to make them work.  We will have to run a lot of water through the refrigerator before it stops tasting of new plastic, but it will be worth it in the long run.  It is a lot more than we had planned for, but the original fridge would have stuck out into the room too far.  Making it difficult to use the sink and just be generally annoying.  Putting the appliances in, really made the space a lot smaller quickly.  We also have a spare freezer in the basement for stocking up at sales or large meat purchases.


New Roof, Kitchen Painting Finished


Last weekend I came home to a new roof, it looks so much better than the old one.  It was a gray day though so  it got tested right away.  The rain went where it was supposed to, so I think we can safely say that it works.

You can see the difference that a new roof makes to our quality of life.  No more shingles clogging up the gutters. No more wondering, what is that in black stuff in the valley.  Also a lot cooler with a lot of the heat reflected away.


I also finished up painting the kitchen, which means that we were ready for the appliances to be delivered.  Unfortunately they couldn't get them to us early enough on Tuesday, so we had to wait until today to get them.

Friday, September 25, 2009

Our roof has come!

It's an exciting day for us, I am overflowing with joy. We no longer have to worry that our house will be ruined due to a roof leak. I had an overly excited pre-teen in my car that wanted to see our house, so after picking up the munckin and her best friend, I drove to the house. To my delight I saw a lot of trucks in front of the house, and a lot of men standing on my house and front lawn. The poor guy I saw first didn't understand what I meant when I told him that they are my favorite people right now. When I pulled away at about 4:20 PM they were approximately halfway done, so I guess I'll find out if they stayed until they finished or if they will be back to finish it on another day.

Tuesday, September 22, 2009

New Floor in the Kitchen and Marble Window Sills Discovered


We finally are done with the kitchen floor, and it looks great, another great job by Harms Carpet.  We still need to add some shoe molding around the room, touch up the ceiling and do a final coat of paint on the walls, then we will only have knob replacement and hinge fixing.  Other than that we will be done with the kitchen.  The best part is we will be able to add appliances after we get the molding and the paint done.


After some investigation today, I decided to peel off some of the paint on a window sill. I was pleasantly surprised to find that it really was marble under all that paint.  Most of the paint peeled off fairly easily. so I am hoping that it goes as smoothly in the rest of the rooms.  There is some paint still on the marble, some internet research should find an answer for that hopefully.

Monday, September 21, 2009

Paint and more Demolition


Today I painted the ceiling in the stairway to the basement.


The kitchen ceiling.  Which took for it seemed like forever, and I think I still need to touch it up.


A second coat of Bullseye 123 in the small bedroom. these walls will be ready for paint after the ceiling is painted.  I think I will prime the ceiling first though since the kitchen ceiling seemed to really soak up the paint today.


Used the last of that can of Bullseye 123 in the nasty purple bathroom.  It was just a fast attack with no edging.  I also skipped the woodwork.  The cupboard, to the left of the picture, needs to be washed out again before hitting the inside of that.  However with just this first coat I now feel like I could use this bathroom without the walls feeling like they are closing in for the kill.  The ceiling looks a lot better as well, and it supposedly already was white.  Of course I might want to put the door back on before i do that, otherwise I can wave to my neighbor.


Then it was upstairs to find out how bad the roof really is.  I wasn't to happy with the answer but it is better than I expected.  We may not have to replace as much sheathing as I feared, but what is there still doesn't look pretty.


I also can finally see the chimney for a wood burning stove that is no longer functional.  It looks like it will be harder to remove than I thought, especially where it connects to the brick chimney.  The only bright spot is the fact that someone managed to get in there it install it, so theoretically someone should be able to get in there to remove it and fix the chimney where it goes in.

I also installed a filter for the heater / air conditioner, I was going to wait to get the correct one when it got serviced, but was able to make one close in size to the remains of the old one work, Menards has a nice selection to choose from.  Then we cranked up the A/C, once I figured out how to change the temperature settings on the control box.  It really cut the humidity and made it a lot more comfortable to work there today.

I was originally going to put the last coat of poly on the floors, instead I will wait so we can get the kitchen floor installed tomorrow, and the windows measured for ordering.  We may also have the roof installed this week, so to prevent any accidental foot prints I may hold off until next weekend.  Tomorrow I will have some time to get things done while the floor is getting installed so will hopefully knock out some more paint related items.

Sunday, September 20, 2009

New Faucet and more Flooring Destruction


Today I installed the faucet we bought to replace the one that was constantly dripping.  It also has a lot higher arc to its spigot than the old one, making it a lot easier to use.  The only difficulty I had was interpreting the picture only directions, and attaching the hoses to from the faucet to the shut off valves we installed yesterday.

The directions had nothing written to enhance the pictures that were provided, while most of it was straight forward, one thing wasn't.  We just couldn't determine if a plastic piece was supposed to be between the sink and the faucet or not.  It is barely visible, so I decided that it was likely supposed to act like a washer for the faucet base, and left it there.  The rest of the faucet assembled easily, with easy snap together parts and hand tightenable fasteners.  The hoses confused me for a while. They said half inch for both ends but for some reason a half inch on one end was not the same as the other end.  So after trying to attach the wrong end to the faucet and deciding that I had some how bought the wrong hose, Tisha pointed out that they were different sizes at each end of the hose.  Which solved the problem and now we have running hot and cold water in the kitchen, extremely nice pressure too.  While replacing all these items I did notice a lot of build-up inside the old valves and smaller sections of pipe.  It really looks like we are going to want to install a whole house water filter to get rid of all the particulate that we seem to have in our water.


I finally removed the last of the carpeting in the basement, so that Tisha could attack the mold in the corner with lots of bleach water and other cleaning products.  She also scraped off the effervescence on the walls, which made the walls look lovely, but should help when we get around to dealing with them later.  The cleaning extended to other sections of the basement, with the basement bathroom getting a more thorough cleaning and the floors getting washed.  Having the laundry room usable now is a nice savings on time and money as opposed to hitting the laundry mat and dropping twenty dollars every week.


The kitchen got just a bit more done today.  The floor removal has gotten to the hardest and most involved part, and we may just pay to have the professionals take it the rest of the way.  It will likely take me almost a full day to get it gone all the way to the cupboards, which is time I really don't have.  If the price it too high I will likely tackle it next weekend or as a plan B for tomorrow, otherwise it will be better for them to take care of it.

I also managed to clean up all the debris from the floor removal and washed down the ceiling in the kitchen in preparation for paint tomorrow, as well as washing down the bathroom on the 1st floor with bleach and a scotch pad to get rid of the mold there.

Tomorrows plan A:  I hope to get the kitchen ceiling painted, the stairway ceiling painted, the small bedroom primed, the 1st floor bathroom primed and a final coat of paint on the walls in the kitchen.  I doubt I will get that far, but it is a nice goal.

Why is that Pie Plate there?


That is what I have been asking myself ever since I found it in the ceiling of the basement.  I first noticed it while tracing wires and pipes in the basement.  When I pulled it out I was amazed that it had been up there in the first place, it was wedged fairly tightly.  I couldn't decide if it was there to catch a leak, hide a hole, or some other strange reason.


It wasn't until yesterday when we pulled the dishwasher out the mystery was revealed, that and more things I wish I never saw.  I love the spaghetti look that is going on here.  The PVC is the drain from the kitchen sink and the bathroom sink. Hot and cold water for both of those is running through there as well.  The main drain and vent is there.  Then as an added bonus a junction box  for the dishwasher, the plugs in the kitchen along the same wall, and for all I know the bathroom are twisted through the plumbing.


Looking to the left of the dishwasher opening I found the board that covers all the plumbing that is from the bathtub.  Including the easily accessed shut off valves, easily accessed  once you pull the dish washer, move the board and make like a contortionist to actually use them.  The pie plate mystery was solved as well as several sports bottles found when we noticed that this cabinet had no back to it, so items can just fall out the back into the space, or if propelled just right, through the little slot and into the basement.


Look, the basement wall....

Saturday, September 19, 2009

The floor that just kept getting uglier


It was amazing, each layer that we peeled off was even more hideous than the last.  I can understand why they covered the previous layer up, but at some point someone should have said that his floor is getting a bit thick.  We used the circular saw to cut break points in the floor to pry up to, then used the wonder bar, a shovel, and later on a really big crow bar that I picked up from Lowes to do the prying.

The picture to the top left shows the top layer, whitish grid towards the top of the picture.  That layer was fairly easy, the next layer with the nasty brown pattern was a lot harder.  It had a lot more staples in this layer, so was a lot harder to pry up.  This layer was the last one prior to the kitchen being remodeled.  We know where the previous cabinets were by the pieces of drywall that was used to level the floor for the top layer.  A small bit of the drywall can be seen, bright white under the top layer, near the cabinet on the left.  The next layer down was stick on faux brick.  this has been the easiest layer to remove, it generally just scrapes right off.  The oldest flooring, and original is the lovely yellow and green tile.  Some of this came off as we were removing the layers above, and some was scraped off by an over eager helper.  We were planning  on leaving that layer mostly intact, but we will see what the flooring guys say.  It may come off the rest of the way, or it may be evened out with compound for the new floor to be laid over.  This is how we left it tonight.

Tuesday, September 15, 2009

I can no longer smell the polyurathane

Really, I can't, I am not certain my nose even recognizes it as a scent separate from myself at this point. Today I had a half day at work, so I was able to get over to the house this afternoon and put down another coat of polyurethane on the floors.  First I had to swing by the Andersons on Woodville Rd to pick up additional cans and some more applicators.  I bought out the Maumee store when I picked up four cans this weekend, so wasn't sure they will have restocked it yet.  I did get a replacement cover at the Maumee store for the sheepskin applicator, but I just could not get the device unscrewed to remove the used one.  So I decided it was faster and easier to spend three more dollars and get a whole new applicator, I will just return the replacement cover later.  I put a third coat on the second floor bedroom, even though it was looking really good after two coats, it was also the room where I had most of my learning curve, so hopefully an extra coat will even out the imperfections.


The First Floor was looking really good with its wet second coat, if only it dried like it looks here.


Four used cans and two partials, the others are partials of primer and kitchen color.


Sunday, September 13, 2009

Polyurethane and Paint, what a lovely smell.

This morning I put down the second coat of polyurethane in the upstairs bedroom and the first coat on the downstairs floors.  I did have to stop and make a quick run to Lowes for a third can because I just did not have enough to make it through the living room.  While I did pick up more yesterday at Andersons, it was a slightly different type of Minwax and I wanted to make sure that it all went down the same way.  So the first coat is Minwax's High durability gloss, the second is Minwax's fast dying gloss and the last coat will be Minwax fast drying satin finish.  I am following the the formula given on an Ask This Old House episode which has been converted to a clip on the website.  It was only recently that I found out why it is two layers of gloss and then one layer of satin.  The gloss is more durable than the satin, so it builds a good base.  The satin then cuts the sheen to something most people prefer to look at.


The next thing that I did was wash down the basement stairs a second time with TSP.  Even though my sister had done it once before I still got an entire bucket of gunk off of them.  While that was drying I changed the light fixtures outside the back door.  They are a major improvement on the existing open look lights that came with the house.  The best part is that they are motion activated, so we now will have a veritable sun light up in the back if someone should be back there after dark.

The last thing I did was prime the basement stairway.  It went from a nasty smoker stained yellow to a decent white.  It will probably need some more in some places the next time I am out there, but it is still a million times better than it was before.

Saturday, September 12, 2009

More floors and color in the kitchen.

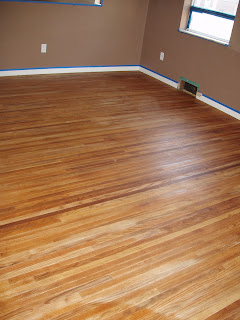
The upstairs bedroom looks pretty good after the coating of polyurethane that I gave it on Thursday, but it was still a bit tacky to the touch in some places so I wasn't able to do anything to it today.  I really wasn't pleased with a few of the marks that the applicator I was using left behind.  So after talking to a person at the Andersons today, I will be using a sheepskin applicator for the next coat.

I also finished prepping the first floor for its first coat of polyurethane; two bedrooms, a short hallway, the living room and a small closet.  The sanding was a bit more complicated with the various nooks and crannies around the door frames and in the closet, so I rented an edging sander this morning to try and get those harder to reach places.  My advice on using an edger, use it first or don't use it at all.  It is a very aggressive device that will put a gouge in your floor in a split second.  Fortunately my gouges are in the closet, so won't be extremely obvious, but I still ended up buying a good palm sander to get into the corners and help smooth some of the whirls left from the edger, used too aggressive a grit on the first pass and spent a lot of time correcting that mistake.  If I had it to do over again I would have saved the money from the rental and just gotten the palm sander for the job.  Any good reason to get a good new tool is worth it right?

I also patched some larger holes left over from running cable and redneck grounds through the floor with dowel sticks cut to length.  I just put a little wood glue on the end, then pounded them down with a rubber mallet, finally cutting them off at floor level with a great flexible saw (another great new tool).  After the glue was dry I then sanded them down the rest of the way with the new palm sander.  It won't match the floor exactly, but will look a heck of a lot better than having a half inch hole in the floor.  There were a few other smaller holes that I was unable to patch because who ever did it used a smaller bit but drilled three overlapping holes, so no way to patch in dowel sticks there.  The final look wet with mineral spirits after wiping it down the final time is excellent though.

While prepping the living room I removed the sill that covered the transition to the kitchen.  To my slight surprise, very little actually surprises me anymore, the floor had been built up 3/4 of an inch with layers upon layers of flooring.
What you are looking at to the left is two layers of underlayment and at least three layers of vinyl flooring.  Two of those layers are sandwiched between layers of underlayment.  After seeing this my curiousity got the better of me and I pried off the sill leading to the basement.  That way I could see exactly what was there.  After looking, all I could think was I need a geologist, there are more layers here than some of the hills in Kentucky.


This view shows another layer of underlayment and two more layers of flooring.  So now we have the original underlayment, two layers of floor, another layer of underlayment, another two layers of floor, then yet another underlayment and another floor.  To think I was considering just adding to the pile, but I think it would be best to get as far down as we can before starting up the sandwich again.  We may not be able to take it all the way down, but at least far enough to make it sane would be good.


We did get the kitchen walls painted today, from a rather drab grey color to a peach something or other ( I just can't remember the name at this point).  The pictures don't do it justice, but in person it is a huge improvement.  The blue on the walls is the same Formica as the counter tops, but used as a backsplash.